Cron Trigger
Introduction
The PayGate workflow Cron trigger takes a cron expression and fires a workflow trigger when the date and time in the cron expression is satisfied. You can use the cron trigger to create simple or complex schedules that trigger once or repeat at regular intervals.
For example you can use a cron trigger to:
- Run a workflow every minute
- Run a workflow every Monday and Wednesday at 10am and 3pm
How Cron expressions work
The cron format is made up of 5 parts:
0 0 10 1 *
They look a bit cryptic at first and so lets break it down. Each ‘part’ of the cron expression represents a element of the schedule:
*    *    *    *    *
┬    ┬    ┬    ┬    ┬
│    │    │    │    │
│    │    │    │    └ day of week (0 - 7) (0 or 7 is Sunday)
│    │    │    └───── month (1 - 12)
│    │    └────────── day of month (1 - 31)
│    └─────────────── hour (0 - 23)
└──────────────────── minute (0 - 59)
For example if the ‘day of week’ (DoW) part is set to 1 then the cron trigger will only occur on Monday. Setting * is a universal way of say ‘any day’. And you can generally use * in any of the parts to mean ‘any value’.
Settings
Title
Choose a title that succinctly describes the trigger. For example, ‘Daily report download’
Description
The description field provides a bit more space to describe what the trigger was designed to do. It is optional but it can help to diagnose issues if you provide a full description of what the trigger was designed to do.
Cron Expression
This is where you will add you custom cron expression. By default, the following expression will be set:
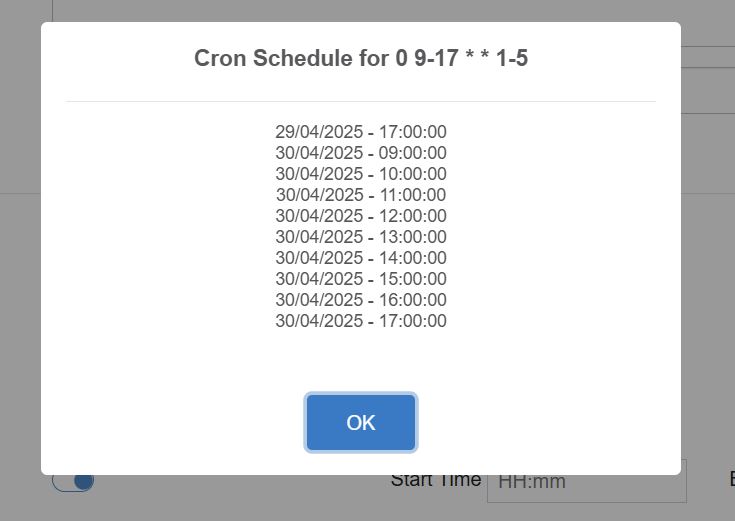
0 9-17 * * 1-5
Below the cron expression the system will provide an written interpretation of the expression. This can be really useful when trying to set the right schedule.

To the right of the cron expression is a ‘View’ button. Use this button to calculate the next ten times that the current expression will fire. Note this button ignores and suppression filters such as quiet time, you might have set.
Enabled
Determines whether the trigger is enabled or not. A trigger that is not enabled (i.e. disabled) will never execute any bound workflows.
Suppress on BACS non-working days
If enabled a trigger will not run any bound workflows if the trigger event occurs on a BACS non-processing day. Bacs non processing days are weekends and UK (English) bank holidays.
Quiet time
You may set a trigger for, say, every hour but you might not want it to run 24 hours. You may only want the trigger to execute workflows during, say, business hours. Setting a Cron quiet time can help with this. By setting a start and end time, you can suppress a trigger from executing workflows during those times. For example, setting a start time of 19:00 and an end time of 0700, you can disable the cron trigger from 7pm to 7am. The cron trigger will function normally outside of those hours (7am to 7pm).

In the above configuration, the cron trigger will start executing bound workflows from 07:01.
Bound Workflows
Bound workflows are workflows that the trigger will execute when it fires. It is best practice to have one bound workflow per trigger but a maximum of three bound workflow can be used.
To add a bound workflow to a trigger, click the + button. A picker will appear showing all workflows for your organisation. Select a workflow from the list and click select. You will now see the selected workflow in the list of bound workflows:

By default the workflow is enabled - note the blue tick on the left hand side. You can enable or disable the individual workflows in the bound workflows list. When a workflow is disabled, it will not execute even when the trigger fires.
The ‘Edit’ link is a shortcut to editing the bound workflow in the Workflow Designer.
The trash icon will remove (unbind) the workflow from the bound workflows list. The workflow itself will not be affected by unbinding.
View Logs
The View Logs button is a shortcut the the logs page. This page shows all workflow executions for this particular trigger. You can drill down into the individual logs by clicking any of the rows in the table.
Clone Trigger
Cloning a trigger will create a new trigger based on the original. Most of the original configuration is moved to the cloned trigger with a few exceptions:
- A newly cloned trigger will be disabled by default.
- Bound workflows from the original trigger are not moved to the clone.
Before cloning, save the original trigger to ensure all the configuration is cloned.
On clicking Clone Trigger a popup will appear suggesting a name for the trigger. This can be amended as required but each trigger must have a unique name.
Clicking Yes! will clone the trigger and take you to the Trigger table. The newly cloned trigger is now independent of the original and can be edited or cloned again.
Notes
Limitations in PayGate cron expressions At the moment, W (nearest weekday), L (last day of month/week), and # (the nth weekday of the month) are not supported by PayGate.